Pages

Wednesday, May 30, 2012

Recycled Toy for Toddlers through Elementary Age


This is a simple toy to create that will engage toddlers through elementary school age children.  Cut out several different size circles in a large box with a flip top lid (this is a winter boot box).  Paint around the outside edges to match the colors of any small balls you have lying around your house.  Inside the box, paint some arrows on the lid.

Once dry, the toddler can match up the balls to the correct colored circle and drop them in the box.  The older kids can try to roll the balls up the ramp and see if they land in any holes.  Let the children create a point system if they want i.e. 5 points if it lands in the correct hole, 1 point if it lands in any hole.  

The kids will have fun with this simple toy.

This activity encourages:
  • color matching for the toddlers
  • eye hand coordination
  • visual motor skills

Tuesday, May 29, 2012

5 Games to Play Around a Campfire

My family and I love to go camping. In fact, we just came back from a four day weekend of camping. Ever since I have been a child one of the things I enjoy the most when camping is sitting around the campfire. Whether it be watching the flames change colors, eating s'mores or just chatting it is wonderful family time.

Here are 5 games we like to play around the campfire:

1. Who Said That? This is great for a large group of people who are all different ages. Prior to sitting around the campfire, have everyone write down (in their trickiest handwriting) one fact about themselves i.e. I once ate a piece of dog food by mistake (I know gross but someone actually said this when we played it once). Fold up the slip of paper and put it in a hat. When sitting around the campfire, give one person a flashlight to start. This person picks out one slip of paper and has to guess who wrote the fact. If they get it correct, pass the flashlight to the person who wrote it and that person picks a slip of paper. If they get it wrong after three guesses the person owns up to who wrote it and they still go next. Continue until all of the slips of paper have been read.

2.  Five Daily Facts:  Go around the circle and each person says five facts about their day or a few days i .e. today I ate ice cream.  Tomorrow I will go swimming. etc.  When each person has said five facts start at the beginning of the circle and try to remember them all.  Player one says one statement that was not his/her own.  Player two says a different statement.  See how many you can remember.  It is harder than you think.  

3.  Charades:  No fire would be the same without a fun game of charades.  If it is too dark, shine a flashlight on the person. 

4.  Name that Tune:  Depending upon the ages playing, we usually start humming a few bars and whoever guesses it first goes next.  Sometimes we do themes - nursery rhyme songs, 80's tunes, etc.

5.  Pass the Ghost Story:  Player one starts the story with one sentence.  Player two adds the next sentence.  Continue around the campfire with each person adding one sentence.  Try to make it around the circle twice and then finish the story.

Of course, take breaks and eat s'mores!

Waiting Games: This is 22 page download of twenty games to play while on a road trip, waiting for an appointment or sitting around a campfire.  This collection of activities encourages children to develop self-regulation, creativity and communication skills while they wait.  FIND OUT MORE HERE.

Thursday, May 24, 2012

Draw Something Sidewalk Chalk Style


Are you familiar with the app called Draw Something?  It is a very fun social app where you play drawing and guessing games with your friends or anyone.  We decided to play Draw Something outdoors using sidewalk chalk.  Here is what you do if you are not familiar with the game that basically combines Pictionary with Hangman.

1.  Think of a word - i.e. island (as pictured above).   Anything simple to start out with works.

2.  Draw boxes for how many letters the word is.

3.  Write letters that are in the word below the boxes.  Scramble the letters and include a few additional letters that are not in the word.

4.  Now the fun begins.  The person who drew out the boxes and letters starts drawing a picture of the word.  Everyone playing guesses out loud. 

5.  If no one guesses it you can "bomb" letters.  The person drawing can choose to start crossing out some of the extra letters that are written. 

Have fun taking this iphone app off the phone and play it outdoors!


Sidewalk Chalk Fun and Games Ebook

Summary - this ebook includes 30 sidewalk chalk games and activities to play

Retail: $4.99

More information at Sidewalk Chalk Fun and Games

Wednesday, May 23, 2012

Spouting Water Jug


Try this spouting water jug next time you are outside for water play.  Using a recycled plastic gallon jug, an adult can cut some slits into the jug.  Pop the hose into the top of the jug and the water will start spouting out.  My son wanted to stick the hose in the side of the jug and put the top back to see if he could blow it up.  Fortunately, for us it did not blow up - haha!  After investigating the spouting water jug, the toddler just wanted to pour it all out and fill it back up again.  Nice cheap entertainment that took less than a minute to make.

Tuesday, May 22, 2012

Toddler Time - Tube Tray


Here is a simple activity for toddlers using recycled items.  Using clear packing tape, attach the toilet paper tubes to a piece of cardboard.  Put a tray of colorful items next to the tube tray.  The toddler can place the items inside the tubes.  For this activity, there was buttons, jingle bells and pipe cleaners to put in the tubes.  When the tubes were all filled up, the toddler enjoyed dumping them all out back onto the tray. 

If you want to vary the activity, try hanging the tube tray from the wall or on a easel.  It requires the toddler to use different muscles (wrist and shoulder more) to complete the activity.

Shared on Tuesday Tots

Monday, May 21, 2012

Pretend Play Animal Rescue


Here is a simple pretend play idea - animal rescue.  The kids pretended to open an animal rescue center.  The first step was to arrange a veterinarian visit for the rescued animals.  Then mini habitats were created for shelter while they healed before releasing them back into the wild.  This was a nice learning experience regarding animal habitats as well as some creative play time.


 Pretend Play Animal Packet

Summary: 28 pages of forms and signs to play pretend vet, pet store, pet show and zoo keeper.

Price: $4.99 for the ebook

Get more information over at GrowingPlay.com.


Saturday, May 19, 2012

Baking Soda Clay for Kids

On Pinterest, I came across this great recipe for baking soda clay from the NewNew blog.  We have since made two batches of this wonderful clay.  Here is why I love it - very easy to cook up, cheap supplies, nice to touch and white!  We have made salt dough in the past and I like this dough so much better.

Here are the ingredients:
1 cup corn starch
2 cups baking soda
1 1/4 cups cold water
Combine the ingredients in a non stick pot.  Stir it on medium until it becomes thick like mashed potatoes.  Once it reaches this consistency transfer it to a different bowl.  Place a cover on it but don't seal it completely.  Let it cool.

Once cool, you can create all different sorts of fun sculptures.  We focused on pretend food making pretend cookies, cupcakes and candy.  Some of the kids added seed beads to the clay for sprinkles (nice effect).  We wanted the pretend sweets to add to our pretend candy shop.  We let them air dry for about 48 hours.  Once dry we painted some but found that permanent markers worked really well on them.  It gave vibrant colors and allowed for more detail.

Here are a few tips:
1.  Don't make anything too fat or it will take too long to dry.
2.  Don't make anything too thin (less than 1/2" diameter) or it breaks off easily.
3.  If you plan on playing with the items you create make sure they are of sufficient diameter or they will crumble or break.

This will be a popular clay recipe in our house!
Shared at the Sunday Showcase Link Up.

Friday, May 18, 2012

Free Candy Shop Bucks to Play Pretend


I am so excited that I finally finished creating this Candy Shop download.  You can download some Candy Bucks to print and play Candy shop with for free.  The Candy Shop complete download is on sale for $2.49 until 6/2/12.  Let your children's imaginations grow with this pretend play download to create their very own candy shop!!!

Thursday, May 17, 2012

Outdoor Fort


Yesterday, I posted about an indoor fort with lights (pouring rain two days ago). Today it was a beautiful day out and my 6 year old decided to take fort building outdoors. Using the parachute, scrap wood and fabric scraps she created this awesome fort. She made a seat for herself and even a guest. She was so proud.

Why not send your kids outdoors with an old sheet or tarp and some loose pieces?  See what they can create using nature and the materials.  This is one of those projects that you have to try not to interfere - let them do it all on their own to create a sense of pride.  

Wednesday, May 16, 2012

Fort with Lights


Grab some battery operated colored lights and toss inside a homemade tent.  Your toddler will be amazed while learning cause and effect and color recognition.  Turning on and off the lights was so much fun and evoked lots of talking ("on...off").  This was loads of entertainment for my little one lasting throughout the day.  

Tuesday, May 15, 2012

Open Ended Problem Solving

Our local school district every year sponsors a learning fair for students grade 4th through 6th. Basically, students complete a project at home and share it at the Learning Fair usually on a poster, table top or a demonstration. The whole idea is for the students to come up with a question or problem and answer it. My children and their friends have participated in it over the past several years and it is a wonderful event. It allows the students open ended learning where they pick the question. It is a great way to introduce early concepts of research and problem solving. In the end, the children learn so much and have so much fun along the way. This year the two questions they came up with in our house are:
  1. How do you make cotton candy without a cotton candy machine?
  2. What can babies see? 
Previous years have included how do cell phones work, how does a hair perm work and how do you make chewing gum? This is a super simple idea to try with your children to grow their abilities to learn and problem solve. Just remember let them pick the topic no matter what it might be (unless dangerous obviously - well making cotton candy without a machine actually turned out to be quite dangerous, hot sugar hurts!)

For the younger crowd, let them participate as well.  Let them come up with the question.  You may just need to help problem solve a bit along the way.  I think you will really enjoy just hearing their ideas and questions.  

Sunday, May 13, 2012

Simple Outdoor Tag Game


Here is a simple outdoor tag game for children of all ages.  Similar to Red Light, Green Light but Wolves and Sheep is even easier (and less cheating and arguing). 

How to Play:
1.  Pick one person to be the wolf.  This person stands on one side of the yard.

2.  All the rest of the players are sheep and stand at least 30 feet away from the wolf at a starting line.

3.  The wolf turns his/her back to the sheep so he/she can not see them.  The sheep quietly walk forward towards the wolf.  The sheep try to make it all the way to the wolf without getting tagged.  The wolf can turn around at any time and try to tag sheep.

4.  Once the wolf turns around the sheep have to run back to the starting line as fast as they can.  If the wolf does tag someone that person gets to help the wolf. 

5.  Therefore if one sheep was tagged two people are the wolves now.  The sheep quietly sneak forward again.  The wolves must turn around at the same time and try to tag sheep again.

6.  Keep playing until a sheep tags the wolf or there is only one sheep left. 

Thursday, May 10, 2012

Lotion Love


Some children enjoy playing with lotion.  This activity offers a pleasant sensory experience as well as an excellent learning opportunity to explore body awareness, body part identification (for the young ones), crossing midline to help with using both sides of the body correctly and right/ left discrimination.

This can get messy but most children really enjoy it.  Lay a towel on the floor and squeeze a small amount of lotion into the child's hand.  Let the child rub the lotion on himself/herself.  Talk while the child is applying the lotion pointing out the body parts and commenting on right or left hand/leg.  If a young child is doing the activity discuss the difference between Mommy or Daddy's foot versus the toddler's foot.

Some children will want more and more lotion and some will not want to touch it to begin with.  The purpose of this activity is to let the child guide it.  By allowing the child to use the lotion on his/her own body it makes the child feel more comfortable with the lotion.  Keep in mind the scent of the lotion - don't use any lotion that is too over-powerful with the scent.

Have fun! Tuesday Tots

Wednesday, May 9, 2012

DIY Pirate Swords


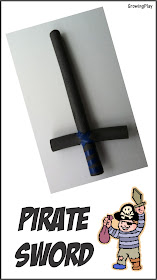
This is a great way to make pretend foam swords.  I made these years ago for my son's birthday party and they still get tons of play time.  Now I know you can buy foam swords in the dollar store but they are not nearly as good as these.  These homemade swords are much longer, more bendable (therefore no pain when playing) and very durable.

All I did was purchase a pack of foal pipe insulators.  Cut them to the size you want.  Cut a small hole in the horizontal handle section and thread the long foam piece through.  Wrap with some blue electrical tape to keep in place and your sword is ready for a fight.  If you make a few these cost less than one dollar each.  You could use a pool noodle but I like the pipe insulation better because they are thinner and more bendable.

Toss them to your children for some good old fashioned pretend pirate play, knights or just some fencing.

Need some more pretend play ideas for boys? Check out Playing Pretend Secret Agent.

Tuesday, May 8, 2012

Tiny Treasures


If your children enjoy playing doll house or any type of pretend play with figures you have to check out this website where the creator offers loads a tiny accessories to print and create.  The creating part is definitely for adult fingers.  It is tedious to work with such small pieces of paper with lots of folding and cutting.  But, the end result for your child's pretend play is worth it.  You can create canned goods, potato chip bags (personal favorite), laundry detergent and groceries.  You can make some candy but it is very tiny.  Here is a quick tip though - I use tape to put them together (not glue).  Put some tiny scraps of paper inside the boxes to fill them out a bit which also prevents the toddler from crushing them.

You can view all the free printables for the groceries here.  You can also surf around the website where you will find printable tiny presents, gift bags and magazines.

Want full size printables for pretend play?  Check out our pretend pages for playing hospital, doctor, school, vet and more.


Sunday, May 6, 2012

DIY Magnet Wand


Here is a super simple activity that will intrigue your little ones and even the older ones.  Just tape a refrigerator magnet (or a stronger one if you have it) on the end of a large popsicle stick.  Put down some lightweight magnetic objects such as bingo chips or paper clips.  Wave the "magic wand" over the bingo chips and it picks them up.  Then the child takes them off with the other hands and places the chips in a container or back on the table. 

If you are doing this with a little one you want the magnet to not be too strong or it is too hard to get the object off the wand.

Just a reminder, supervise closely for choking hazards!

This play activity encourages:
  • fine motor skills
  • bilateral coordination
  • eye hand coordination

Thursday, May 3, 2012

Crayon Fingers


After seeing this blog post about finger painting with melted crayons,  I remembered how much I used to love sticking my finger tips in the cooling wax of a candle as a child.  I had to do this with my children.  We melted some old broken crayons in disposable cupcake holders.  It only took a few minutes in a low temperature oven.  Once melted, we let them cool briefly and then I tested it.  Making sure it was not too hot for them, they started dipping the tips of their fingers in the melted crayons. 

They all dipped their fingertips in and enjoyed the process.  Some tried writing with them but that was not nearly as fun as peeling it off or moving the tips of your fingers to try and crack the melted wax. 

The kids asked to repeat this process several times.  The melted wax cools quickly so I would just pop it back in the oven for less than one minute, check the temperature again and let them start dipping. 

Fun activity for sure. 

Obviously, the wax can get very hot so supervise very closely!

Cracker Cookies


I love to cook with the children in the kitchen but I have to be in a certain frame of mind.  Some days I want to create something with them that does not involve a lot of clean up or baking time.  We came up with cracker cookies.  All we did was melt some chocolate chips in the microwave and dipped crackers in the chocolate.  Some were then dipped in sprinkles.   You do have to be very gentle with the crackers but if you are cooking with younger ones you could use pretzel rods instead.  Just lay the dipped crackers on waxed paper on a cookie sheet and pop them in the freezer for a few minutes.

The end result was an enjoyable time together in the kitchen, a lunch box dessert, no baking time and barely any mess to clean up.

Tuesday, May 1, 2012

Ball of Surprises


After seeing this idea on Pinterest about making surprise snowballs, I thought my toddler would enjoy this any time of year.  So I just wrapped up a few trinkets from around the house inside some crepe paper to make a large ball.  Just start with a small trinket and start rolling.  I tucked the last piece in and let her have at it.  I had to help start it but then she enjoyed unwrapping the whole thing to reveal bean bags, a toy cat and more.

She did have fun unwrapping it but she had took more pleasure in just ripping and throwing the crepe paper.  When she was done with that I re-rolled the crepe paper into a ball which was about the size of a soft ball.  We tossed the ball around the room.  She thought this was so funny because it was so soft you could hit people with it, that was the best part for her.

This is what I always enjoy about kids and play.  I originally thought this would entertain her for a few minutes, literally.  It landed up lasting about 30 minutes (which is an eternity for a toddler).  She directed the play to go in a different direction and that is what play is all about.